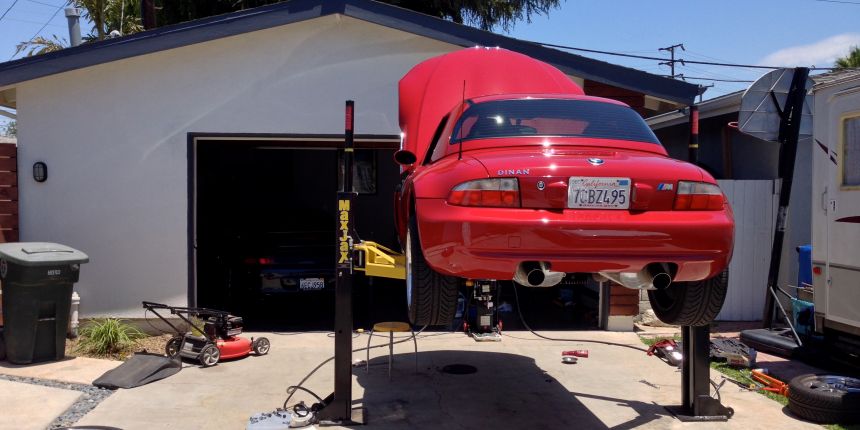
After an initial oil change service and some further driving of the car so that I could identify everything it needed, I started the multi-week teardown using my mechanic's lift to allow me full access to the underside and drivetrain of the car. Luckily I also had full use of a two car garage and work bench to store all of the removed pieces which needed servicing, like the seats, wheels, mufflers, front bumper and differential. The wheel wells and undercarriage had a thick layer of dust caked on to them, but the engine bay and interior were very clean, as they appeared to have been cared for fairly regularly.
The teardown started with the removal of the driver and passenger seats to replace the original seat bushings which by this time had nearly evaporated. This process was fairly straight forward and while the seats were out the carpets were cleaned and any found coinage was added to the parts collection fund. Next, the car was put on the lift, the wheels were removed and then the exhaust, head shields, driveshaft, shifter assembly and differential. To remove the years of caked on New Mexico sand, the undercarriage was treated in multiple steps with engine degreaser, simple green, a steam cleaner, a cleaning brush and high pressure washer. Having many of the drivetrain components removed made cleaning much easier, but it was still a very time consuming and laborious process.
In my summary of each service I've included my estimate of what an independent BMW mechanic shop may charge. I did this to give you an idea of the cost in case you’re planning to have your mechanic perform any of these services. Obviously, these are just estimates and prices can vary.
First Oil Change
Parts: Oil filter, 11-42-7-833-769-M67 ($10), 6.5 quarts Mobil 1 5W30 synthetic oil ($50)
Tools: Service Reset Tool
Comparable Shop Labor: 1/2 hour ($65)
This would be the car's first oil change under my ownership, so I paid special attention to the color and level of the oil and the condition of the oil filter so that I could have a good understanding of what I was starting out with. Luckily, it appears the previous owner had changed the oil on a regular basis, as there were no abnormalities and the overall condition of the old oil looked normal.
I always use Mobil 1 synthetic motor oil and the 5W30 weight is the recommended oil of choice for the S52 motor, at least in the production date of this car. I would be driving the car year around, and because I live in Southern California where the temperatures are fairly tame, I will stick to this oil weight throughout the year. During the oil change, while the drain plug was open, to better clear out the old motor oil I poured a quarter of a bottle of new oil to flush out any old oil still in the oil pan. I only use BMW, Hengst or Mann replacement oil filters, changing the small and large rubber O-rings in the oil filter cover and bolt, and lubricating them before reinstall. I also use a new copper crush ring on the drain plug at every oil change.
Once the drain plug is retightened, the new filter is installed and the oil filter housing cover is tightened, and 6 to 6.5 quarts of oil are added, I check the oil level and top off as needed. The service lights are then reset using a reset tool and I conduct another visual inspection of the engine and undercarriage before closing the hood. Since this was my first time performing an oil change on the car, I performed another full oil change after 1,000 miles as a preventative measure to clean out the engine of any old engine oil.
Spark Plug Service
Parts: Bosch Platinum 4+ plugs, 4417-M14 ($72)
Special Tools: none, other than sparkplug socket and extension
Comparable Shop Labor: 2 hours+ ($260)
The Bosch Platinum 4+ plugs are one of the best plugs you can buy for the M Roadster and during some build dates these were used by the factory, whereas on other earlier dates Bosch 2 plugs were used. They are rated to last well in excess of 50K miles depending on driving conditions and will help improve power and increase fuel efficiency.
Replacing the plugs requires removing the plastic engine cover held on by two bolts and then unbolting and unplugging each solenoid to access the plugs. This is a good time to inspect each solenoid unit for damage or wear and to clean the area of dust and dirt. During this time I also inspected the valve cover gasket for leaks or oil seepage (none found).
The old spark plugs were in good condition and didn't show any signs of the engine running rich, hot, etc. I could have reused the old plugs for another 10-20k miles, but for the low cost of replacement, it didn't make sense to reuse them. And after installing the new spark plugs, the engine felt slightly more responsive and powerful.
Replacing DINAN Cold Air Intake Air Filter
Parts: DINAN cone filter ($50)
Comparable Shop Labor: 1 hour ($130)
I replaced the DINAN CAI cone filter with a new unit purchased directly from DINAN in Morgan Hill. The air filter pulls in air directly through the driver's side brake duct, into the carbon fiber cold air intake, and will be serviced every 12 months or sooner depending on driving conditions. The DINAN CAI system improves engine throttle response and power, and as an added bonus I get better mpg as well on the highway.
To replace the air filter, the driver's side headlight needs to be removed. The top of the cone filter (facing down at the ground) should just peek out of the driver's side brake duct, allowing it to suck in cold air from the outside. Once everything is positioned correctly, all of the parts are tightened in place and the headlight is reinstalled. Note: this is a good time to inspect the throttle body boot for cracks or damage due to age. You should also inspect and if necessary clean the mass air flow sensor and throttle body since you have direct access to these while the CAI is off. I decided to thoroughly service the throttle body and MAF sensor.
Cleaning Mass Airflow (MAF) Sensor and Throttle Body
Parts: Air Mass Flow sensor cleaner spray ($10), Throttle body cleaner spray ($7)
Special tools: none
Comparable Shop Labor: 1 hour ($130)
Cleaning the MAF sensor every year can improve a car's performance and gas mileage. The process requires removing the air filter housing or Cold Air Intake and spraying specially designed cleaner into the MAF sensor chamber to clean off any dirt. Care has to be taken so as to not damage the sensor. I used special MAF sensor cleaner spray, purchased from my local auto parts store. I removed the MAF sensor housing from the car in order to thoroughly clean it.
In addition to servicing the MAF, I removed the MAF sensor housing to access and clean the throttle body. This is a fairly simple process and will help ensure your engine is kept clean and void of dirt and particles that may have passed through the air filter. Using throttle body cleaner spray, use your fingers to open the butterfly open and use a rag to clean away the dirt. The throttle body was dirty and probably hadn't been cleaned in some time.
Replacing Water Pump, Thermostat & Drive Belts
Parts: Water Pump: 11-51-7-527-799-M52 ($85), Thermostat: 11-53-7-511-580-M2 ($30)
Thermostat Housing Gasket ($3), BMW Coolant/Antifreeze: 82-14-1-467-704 ($25)
Distilled water ($3), Drive belt ($20)
Special tools: Fan clutch removal tool
Comparable Shop Labor: 3 hours+ ($390)
In the mornings, the water temperature of the engine would take a long time to warm up (reach the center mark on the temperature gauge), even after a few minutes of driving on the freeway. When driving in colder weather (below 40 degrees), the water temperature would drop below the center mark. I had performed a coolant flush to address this issue, but the problem continued, so I decided to replace the thermostat, which did solve the issue. Since I was performing this task I also replaced the water pump and thermostat housing gasket. The thermostat housing was in perfect condition. The water pump was also in good condition and already had a metal impeller (My car is a 99 model), but I decided to replace it anyway since it appeared to be the stock unit.
The process of replacing the thermostat and water pump is fairly straight forward. I don't remove the plastic fan shroud around the engine fan. Instead I drain the coolant, remove the top coolant hose, loosen the bolt holding the fan clutch (motor fan) to the engine and then remove the fan. This gives me access to all the bolts that need to be removed to perform the job. Removing the accessory belt is also very simple by removing the cover for the tensioner and using an Alan tool to move the tensioner to loosen the belt. After the thermostat cover, thermostat and water pump are removed, all surfaces are thoroughly cleaned and some hard to reach areas of the engine are degreased if needed. No gasket sealant should be used when reinstalling the cover. This is also a good time to inspect the coolant hoses for signs of damage or any cracks, which my car didn't have. I also inspected the fan clutch and the radiator for cracks and signs off damage and found no issues. Once everything is installed and the proper mix of coolant and water is added, you'll need to perform a coolant system bleed to remove any pockets of air.
This is also a good time to replace your drive belts if you haven't done so in a while and especially if you see cracks in the belt.
Replacing the Fuel Filter
Parts: Fuel Filter: 13-32-1-740-985 ($30)
Special tools: none
Comparable Shop Labor: 2 hours+ ($260)
Replacing the fuel filter is an easy and inexpensive way to ensure your car's engine is running on clean fuel, but it is also commonly overlooked. The service requires removing a heat shield from underneath the car, on the driver's side, unbolting the bracket that holds the filters and then loosening it from the fuel lines on each end. Depending on where you live and the quality of the fuel you have access to, you shouldn’t have to replace the fuel filter too often, but it’s not uncommon to find original fuel filters on 15 year old M Roadsters and M Coupes. Trust me! Luckily, the filter on my car wasn’t the original unit and when I emptied it the fuel coming out of the rear side (fuel traveling from the tank towards the filter) was clear and free of particles. I know the car had the DINAN flywheel and sports clutch installed around 20K miles, so that may be when the fuel filter was replaced as well. That was about 25k miles ago by the way.
Replacing Leaking Power Steering Hoses
Parts: (2) Sealing ring for Power Steering Lines, 32-41-1-093-597-M17, ($1)
Power steering hose, 32-41-1-138-419-M20, ($26), Power steering hose, 32-41-1-094-558-BOE ($36)
Power steering fluid reservoir,($50), OEM approved power steering fluid ($20)
Special tools: None
Comparable Shop Labor: 2 hours+ ($260)
My car was suffering from a small, but nasty power steering fluid leak from one or more hoses that was emptying out the fluid reservoir fairly quickly and covering the bottom of the engine bay cover with oil. Luckily there was still fluid in the reservoir so the steering rack hadn't sustained any damage.
Replacing the hoses is fairly straightforward once you have access to the top of the power steering unit and the bottom of the reservoir to disconnect the lines. I connected the reservoir before to the new hoses before attaching them to the power steering rack or fluid cooling lines. Power steering fluid can make a real mess when left leaking in the engine bay over time, so this is the best time to degrease and remove caked on soot.
After all the parts are installed, fluid is added, the engine is started and the steering wheel is turned side to side to allow the fluid to circulate throughout the system. Additional fluid is added as needed after this is performed. A few days after the install the lines were inspected again to ensure the leaking had stopped.
Upgrading Engine Under Panel
Parts: Motion Motorsports Roadster/Coupe Under panel Kit ($178)
Special tools: Sharp cutting blade
Comparable Shop Labor: 2 hours ($260)
The M Roadster has plastic under panels to protect the bottom of the radiator, various hoses and cables. The under panel also helps make the underside of the car more aerodynamic. The Motion Motorsports unit is cut from one piece of metal and secured to the front frame of the car. It increases the protection of the engine block, cooling system and electrical wiring, keeps road debris and water out of the engine compartment and keeps the underside of the car aerodynamic.
Installation requires removing the stock center and side under panel parts. The kit attached to the car's front frame with two posts and also attaches to the front bumper. My unit was installed with the bumper off the car, making installation much easier and accurate. This is a fairly simple upgrade for spirited drivers to protect their cars.
Replacing Transmission Seals
Parts: Selector Rod Seal (Manual Transmission): 23-12-1-282-394-M30 ($10),
Shift Rod Circlip: 25-11-7-571-899-M9 ($2), (2) Redline MTL Transmission fluid ($30),
Output shaft seal (Manual Transmission): 23-11-1-224-799-M204 ($11)
Special tools: BMW output shaft seal arbor, PEL-TOL-3020 (Sold by Pelican Parts)($35) and bolt puller.
Comparable Shop Labor: 6-8 hours ($780-$1,040)
During the car's pre-purchase inspection, the BMW Dealer noted seepage from the rear seal of the transmission. Prior to servicing the transmission seal I performed a fluid change using Redline MTL synthetic fluid. After the fluid change the car was driven and the transmission started leaking fluid just enough to wet the bottom side of the transmission. It was evident that the seals needed replacement. Upon further inspection I found the shifter linkage shaft seal also leaking. Getting to the rear transmission seal requires a large investment of time in order to remove the exhaust system, heat shields, and the drive shaft coupling (Guibo), the driveshaft, and finally the transmission spindle which connects to the driveshaft.
The seals for this task can be fairly inexpensive, but it's the labor which makes it such an expensive repair. A special seal arbor is also required to properly mount the seal onto the back of the transmission. Because of a spindle protruding from the back of the transmission, it's not possible to use a normal seal driving kit. I used a head gun to heat up the spindle for easier removal and installation. This job is not for the inexperienced, as poor seal installation will eventually require another time consuming teardown.
Etcetera: The clutch felt like a new unit and there were no shifter-pin related issues (For example: shifter popping out of second gear towards fifth instead of third gear when cold), so no other services were needed to be performed to the transmission. Also, note that while the exhaust and other parts are out, this would be a good time to replace the Guibo, shifter parts, and transmission mounts, which is exactly what I did.
Flex Disc and Driveshaft Center Support Bearing
Parts: Flex Disc, 26-11-2-226-527-M57 ($108), Driveshaft Center Support ($98)
Special tools: None
Comparable Shop Labor: 3-4 hours ($390-$520)
Access to replace the flex disc and driveshaft center support bearing requires removing the exhaust system and head shields. Opening the six bolts connecting the driveshaft to the transmission is fairly straight forward, but removing the center support bearing from the driveshaft can be difficult and time consuming, especially if you've never done it before.
Replacing these two parts can help improve throttle response and overall driving performance. The Flex Disc on my car showed cracks and needed to be replaced, but the center support bearing was like new. I decided to replace the center bearing anyway since I was already accessing the area and the unit was now 15 years old.
Replacing Manual Transmission Shifter Linkage
Parts: Shift Arm Bushing, 25-1-112-222-015 ($22), Selector Arm Bushing, 25-1-112-20-439 ($3)
Shift Tower Bushing, 23-11-1-469-397-M92, ($5), Shifter Arm Bushing, 25-11-7-507-695-M9 ($5.75)
Special tools: None
Comparable Shop Labor: Actual refresh of transmission parts is 1-2 hours or $130-260 (estimated). Labor to get to transmission parts requires removal of exhaust system and driveshaft and can range from 4-8 additional hours.
The shifter on the M Roadster is short and designed to be tight. It's also one of the best feeling shifters out there and is often used to replace the stock shifters of other BMW models. Over time and due to wear and tear the shifter can lose some of its tight feel, leaving a sloppy sensation when shifting. To remedy this, the shifter linkage bushings at three points under the car need to be replaced with new pieces. The parts are fairly inexpensive and the labor isn’t too difficult, but getting to the parts can take a number of hours. The best time to perform this job is when you’ve already dropped the exhaust and driveshaft to complete other repairs and have access to the transmission linkage from underneath the car.
I opted to replace the parts with OEM replacements, but urethane aftermarket options are also available for those who want an even tighter feel. Once the parts are replaced and properly lubricated, you should notice a considerable difference in the accuracy of the shifts and little to no sloppiness when moving the shifter.
Replacing Engine and Transmission Mounts
Parts: (2) Engine Mounts ($100), (2) Transmission Mount, 22-31-6-799-331-M69 ($25)
Special tools: None
Comparable Shop Labor: 2-3 hours ($260-$390)
Replacing the engine and transmission mounts will help improve the feel of the car by replacing rubber mounts which may be worn or damaged, which tend to have more "give", have sagged or have become too hard. Even if the mounts show no physical signs of damage or settling, after 15 years it's most likely time replace them. Once the engine mounts are out, you can compare them to the new units and see how compressed they are.
Replacing the mounts may reduce engine and transmission vibration during idling and acceleration. You'll certainly feel the difference under hard driving. Depending on the condition of the original parts, after replacing the mounts drivers may feel crisper acceleration, throttle response and more direct shifting. The transmission mounts are easy to replace, but the engine mounts require much more time and effort, as the top bolts need to be removed through the engine compartment and the engine has to be slightly raised one side at a time to remove each mount.
Servicing Differential
Parts: (2) O-Ring for Differential side cover, 33-11-1-214-144-M213 ($5)
(2) Output Shaft Clip for Differential, 33-13-1-207-280-M9 ($1.50)
(2) Differential plug aluminum washer, 07-11-9-963-355-M131 ($0.50)
(2) Differential Drive Flange Seal, 33-10-7-505-603-M104 ($16.50)
(1) Differential Pinon Shaft Seal, 31-50-7-609-535-M204 ($8)
(1) Gasket for Differential cover, 33-11-1-210-405-M9, ($5)
(2) Mobil 1 75W140 Limited Slip Differential Fluid ($25), (1) Engine degrease spray ($5)
Special tools: BMW output shaft seal arbor (discontinued)
Comparable Shop Labor: Easily 8 hours of labor from start to finish if differential is removed. ($1,040)
During the car's pre-purchase inspection, the BMW dealer noted seepage from the differential cover gasket, a five dollar part. Upon my inspection I noticed caked on road dirt, but no serious fluid leaks. To ensure that the differential wasn't low on fluid, I performed a fluid change. After just a hundred miles or so the differential sprung a major leak, dripping fluid onto my driveway, around the undercarriage of the car and unto the bottom side of the DINAN free flow exhaust system. I cleaned the differential and drove it for a few more miles to pinpoint the leak. It turned out that driver's side output shaft seal was leaking, not the $5 paper filter for the differential cover, as originally suggested by the dealer. I decided to remove the differential to perform the following:
- thoroughly degrease differential housing and cover
- properly replace all of the seals and gaskets
- inspect/test differential to see if a rebuild is necessary
- access to the undercarriage for sub frame degrease and install new sub frame reinforcement kit
The differential was cleaned, the cover was removed and all pieces were inspected for wear. Each output shaft received a new rubber O-ring, seal and lock ring. The differential cover was painstakingly cleaned, remounted using a new OEM paper gasket and RTV compound. All bolts were torqued to spec, double checked and then the differential was filled with Mobil 1 limited slip synthetic differential fluid. The differential mounting bushing was inspected and found to be in perfect condition.
Note: I did not rebuild the gears in the differential, as the unit was in good working order.
Preparing for Part 4…
Next up will be the suspension system, brakes and undercarriage components that need addressing.