The suspension system of the Z3 M Roadster is fairly straightforward, using Macpherson struts in the front and a trailing arm system used in the rear that was first used in the 3-series cars back in the 1980s. The BMW Motorsport Group did make a number of meaningful upgrades to the suspension of the M cars vs the standard Z3s by installing stronger components, similar to parts found on the e36 M3. You can see the enhancements from subtle differences like where the front swaybar links connect to the strut housing instead of the control arm.
In stock form, the M Roadster's factory suspension rides soft, which can be a handful during hard corning. The softer suspension, when mixed with the car's short wheelbase, can lead to over steer and the backend snapping out when you least expect it. It's been my experience that for driving enthusiasts looking to improve their Ms, improving the suspension system should be the first order of business on these cars, as the increase in handling grip and confidence can be tremendous and will drastically transform the driving experience. Obviously there are many choices for suspension upgrades ranging from just refreshing the stock system with new struts and shocks, to mild performance upgrades like installing sports shocks and springs and bigger sway bars, to upgrading to systems set up for autocross or track days by installing coilover suspension, urethane bushings and mounts, and camber plates. My car's suspension was already setup using DINAN's S2 suspension package, with shorter springs which lower the car about an inch, custom valved adjustable Koni shocks, and thicker sway bars front and rear with urethane mounts. The DINAN system is the closest thing to stock in terms of ride comfort and ride height, however the corning grip and overall handling is greatly improved. As I planned to drive this car daily and enjoy it on spirited drives, I decided to refresh the DINAN suspension by overhauling the worn Koni shocks, plus switch out the components of the front and rear suspension that can wear. This included the control arms, tie rod assemblies, mounts, bushings and links.
Before I started the overhaul, I noted that under hard acceleration the car would squat in the rear and rise in the front. This was a clear sign that the shocks and possibly some of the lower suspension components were worn out.
Replacing Front & Rear Suspension Components: Shocks, Mounts, Control Arms, Bushings and Sway Bar Links
Front Parts:
Koni Adjustable Sport Struts (DINAN replacements), ($350)
BMW MZ3 Control Arms (L&R): 31-12-2-228-461(2) ($400)
Sway Bar Link Front (x2): 31-35-2-227-203 ($60)
Suspension Coil Spring Shim Lower (x2): 31-33-1-124-322 ($5)
Spring Pad Front Upper (x2): 31-33-1-128-523 ($5)
Upper Strut Mount (x2) 31-33-2-227-897(8) ($120)
Tie Rod Assembly (x2): 32-11-1-139-316(7) ($90)
Pre-pressed BMW Motorsport offset lower control arm bushings (x2) ($110)
Rear Parts:
(2) Koni Sport Shock - Rear Adjustable, 8040 1217Sport ($195)
(2) Gasket, for rear upper shock mount, 33-52-6-772-864-M30 ($2)
(2) JT Design Rear shock mount, 33-52-1-137-972-490 ($45)
Sway Bar Link Rear (x2): 33-55-1-135-307-M69 ($30)
Four wheel laser alignment ($150)
Comparable Shop Labor: 8 hours+, but most shops offer package pricing for suspension jobs. ($1,040)
Special tools: Spring compressor, impact gun, wedge tool or pry bar to remove front control arms
Front Suspension
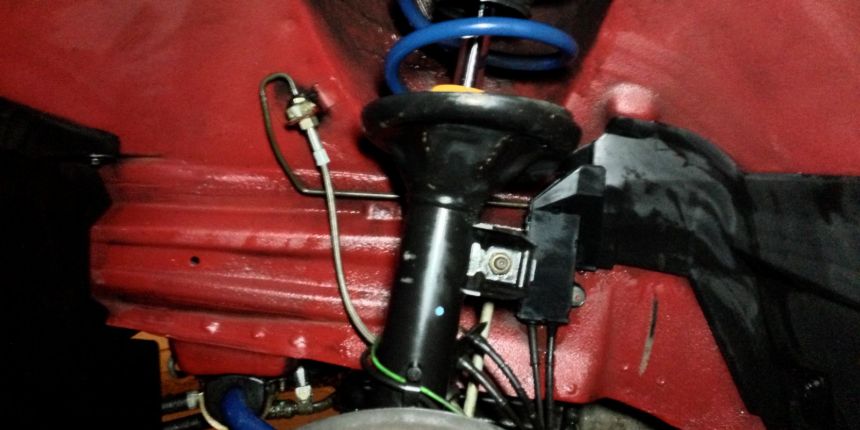
For the front suspension, the idea was to have the car handle like new or better, with tight steering feel and nimble cornering. To do this I needed to replace a number of suspension components, not just the shocks. The Koni shocks used by DINAN in the front suspension slide into the strut housing and then get bolted in. Removing the front struts from the car is a fairly straight forward process, but you'll need a spring compressor to safely take off the upper strut mount. Once the strut housing is disassembled, I replaced the upper and lower rubber spring shims as the rubber mounts can harden, and then installed a new upper strut mount, as is has a center bearing that can wear out over time. The rubber mounts can also harden.
Next, I replaced the control arms with OEM BMW replacements, as I've found these original parts to be the best lasting replacements. Removing the control arms can be difficult if the large bolts mounted to the subframe spin with the bolt, or if the bolt is simply stuck. I treated the bolts with PB Blaster the night before to avoid seized bolts, but I still had issues removing them and finally had to use the help of a second person to apply a wedge between the control arm and the subframe to keep the bolts from spinning. Installing the new bushings to the new control arms was very time consuming as I chose the BMW Motorsport offset bushings which are solid and require a lot of pressure to slide onto the control arm. It took a lot of grease and creative mechanical ingenuity to get the bushings seated. I chose the offset bushings because they provide a slight degree of negative camber, which allows the car to have increased turn-in grip, which eliminates any understeer and vastly improves the car's handing. The wheels will sit a little more forward in the wheel well as a consequence, but if you're running stock rim/tire sizes, that won't pose a problem. I also replaced the sway bar links with new units to ensure a tight feel, as the original parts were over 15 years old now and felt somewhat loose. The final step was replacing the tie rod assembly on each side to ensure every moving part connecting the suspension and steering to the front wheels were replaced with new parts.
The Koni's are adjustable for firmness by turning the top bolt located in the engine bay. I kept my system set to the middle setting.
Rear Suspension
The M Roadster's stock suspension has a characteristic of squatting under acceleration. Since this was still happening with the DINAN springs and Koni shocks, it was obviously time to replace the rear shocks. Although the existing shocks didn't have more than 25k miles on them, they had been sitting on the car for more than 10 years and appear to have lost some of their recoil characteristics. The replacement adjustable Koni shocks come with metal dust boots, just like the original DINAN units. I had ordered them from Bavauto, who reported otherwise, but the kit included the correct boots.
Removing the shocks requires accessing the rear shock tower mounts by removing the carpeting under the convertible top behind the roll bar (with the top up). There are two 13mm bolts holding each mount and an 18mm single bolt holding the bottom of the shock to the rear trailing arm. The rear Koni's are adjusted for firmness by turning (spinning) the shock left or right. I set the shocks at the middle setting. While the shocks are out, this is a good time to inspect and replace the mounts as well. My car still had the original OEM mounts which were not damaged, but tend to flex for a more comfortable ride. I decided to upgrade the mounts to the JT Design mounts to increase reliability and performance, especially for hard driving.
For some, this would be an opportune time to replace the rear trailing arm bushings and possibly even the rear subframe mounts. Having done so on a previous M Roadster, I decided I liked the handling characteristics and ride of the car as it was, so I didn't touch these parts. I may replace them in the future depending on how I use the car. Overall the bushings were in good condition and didn't need to be replaced.
Next up was replacing the rear sway bar mounts with OEM units. These have the rubber mounts and car wear out over time, especially when combined with aftermarket performance sway bars which can put a tremendous amount of pressure on them. On my car the right rear sway bar link was broken, so I had a shop professionally weld AKG Motorsport reinforcement plates. This is discussed in detail below.
Summary
Once all the parts were installed, the handling was vastly improved. The squatting issue was gone. Even under hard breaking, the front end wouldn't dip down. The traction control wasn't coming on as much under hard corning and the wheels felt more planted with the road. The biggest improvement came from the offset bushings, which dramatically changed the front end grip and how much speed the car could carry into a corner.
Fixing and Reinforcing Broken Rear Sway Bar Links
Parts: AKG Motorsport rear sway bar link reinforcement ($30)
Rear Sway Bar Link, 33-55-1-135-307-M69 ($14), Collar nut 8mm locking, 07-11-9-905-374-M58 ($0.75)
Comparable Shop Labor: 2 hours ($200)
Special tools: Requires professional welding and rust proofing
While not as common as the subframe reinforcement issue, rear sway bar links can brake because of an aggressive rear suspension setup or potentially rust. In the case of my car the tab holding the sway bar link snapped off the right rear trailing arm where it was connected. Instead of repairing the tab back to factory I ordered the AKG kit and had a professional welder install them on both sides to eliminate this issue from ever happening again. The kit is relatively inexpensive at $30 and well designed with heavy gauge steel. The labor involved in installing them is much more costly as the existing metal needs to be cleaned and the new reinforcement tabs need to be professionally welded on and then painted to protect the metal from the elements. The final result is a sway bar link tab that looks like stock and will put up with the heaviest driving conditions and never fail again.